IMPORTANT NOTICE
- ALL INFORMATION HAD BEEN TAKEN FROM NATIONAL GEOGRAPHIC WEBSITE
- WRITTEN BY JIM RICHARDSON
- Contributing editor Jim Richardson is a photojournalist recognized for his explorations of small-town life. His photos appear frequently in National Geographicmagazine.
- Some snaps are also captured by ANMOL PAWATE as signed in pictures
TIPS ON OUT OF FOCUS ON PURPOSE
Here are a few tips:
- F-stop matters somewhat less than is generally taught. Yes, you can control the range of focus from any given subject distance, but just controlling the f-stop won't usually turn a crystal-sharp background into a dreamy-soft background.
- Closeness to subject matters a lot. Put simply, if you really want to throw the background out of focus, get really close to your main subject. Even an extreme wide-angle lens like my Nikkor 14-24mm f/2.8 has a really shallow depth of field when the subject is six inches [15 centimeters] in front of the lens. Getting close to your subject has a huge influence on the background sharpness.
- Relative subject distance matters a lot, too. Separating your subject from its background by a large relative factor is a powerful way to control depth of field. If the subject is two feet [0.6 meters] away and the background is 50 feet [15 meters] away, you get very shallow focus. On the other hand, I remember shooting football games in bright sunshine and trying to make the players stand out from the crowd behind them. If the players were on the other side of the field and the crowd was just a bit farther off it didn't matter what f-stop I used, even with a 300mm f/2.8 lens. But just a little change in angle put the crowd further away and the players popped out nicely.
- Get lower to the ground. Huh? This sounds really stupid. But consider this: If you are standing up while taking a picture of a flower on the ground, then the background behind the flower is virtually the same distance away. But if you get down low the background is now much, much farther away and perfectly out of focus. This phenomenon was well known in the days of twin-lens reflex cameras, which were easy to set on the ground and view looking down into the viewfinder. Take a look at fashion photos from the '50s shot on a Rolleiflex to see the effect. Works like a dream.
- Choose a background lacking in specular highlights. Lots of small bright highlights are always harder to get pleasingly out of focus than something large and featureless. (And if the background is a perfectly plain sky it probably doesn't need to be out of focus at all.)
- Get a bigger camera. If you have a point-and-shoot then get a digital SLR. If you have a small-chip DSLR, then get a full-frame DSLR. If you really want out of focus, get an 8x10 camera. The physics of lenses is such that the larger the actual film or sensor, the less depth of field you have. Point-and-shoots have extremely short focal-length lenses, resulting in just about everything being in focus no matter what you do. (If you are a depth-of-field junkie and want to argue this point, then read on to the next item, where you'll find even more to harrumph about.)
- Get a longer lens. Physics again. The longer the lens, the less depth of field—in practice. Wide angles have more depth of field and telephotos have much less—in practice. (If you are a depth-of-field junkie I can already hear the howls of protest on this one. Yes, I know all the arguments and the way depth-of-field discussions turn into raging flame wars on the Internet. But for the general practice of photography as done by working photographers, this is true enough to prescribe.)
- Buy a tilt-and-shift lens and use it wrong. The tilt part is what comes into play here. The effect of tilting the lens to produce more depth of field has been known almost since the beginning of photography. And generally that's what a tilt-and-shift lens is used for (beside keeping tall buildings from falling over). But there is nothing to keep the creative photographer from doing it "wrong"—tilting it the other way and decreasing the depth of field by a lot. It can look very cool. On the other hand, it seems everybody in the world now knows this trick, which means it will soon enough be passé.
- Buy a Lensbaby. This is a tilt-and-shift lens (minus the shift part), combined with a lens element that makes the edges of the image pretty soft to begin with. Great fun to play with and it gives you just huge control over depth of field (as long as you want less).
- Just reach for the "blur" brush in Photoshop. Most any software today gives you abundant options to blur a picture and then paint back detail where you want it. But realize that when you do this you are seriously getting into the world of "fiction" photography. It might be beautiful and dramatic, but be very careful that you don't represent the resulting photograph as being "nonfiction."
- .ALL INFORMATION HAD BEEN TAKEN FROM NATIONAL GEOGRAPHIC WEBSITE
- WRITTEN BY JIM RICHARDSON
- Contributing editor Jim Richardson is a photojournalist recognized for his explorations of small-town life. His photos appear frequently in National Geographicmagazine.
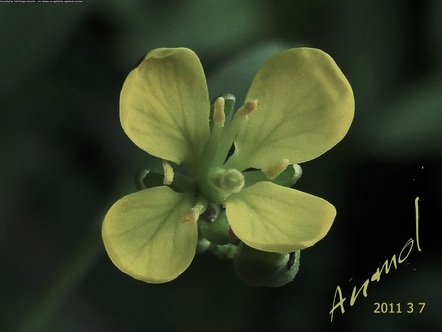
Example of OUT OF FOCUS ON PURPOSE..Of course I'm not talking about my usual out-of-focus pictures, the ones I delete immediately and never tell a soul about. No, I'm talking about the intentional things we photographers do to limit the depth of field in our pictures. Things we can do to make the backgrounds nice and soft, leaving just the subject in focus and standing out dramatically from its surroundings.
A Point of View
Finding the right point of view is often the key to making fresh pictures. So let me get to the point: If you had the choice of buying two new pieces of gear to improve your photography, which two would you choose: a new lens, a stepladder, or kneepads?
Easy! Buy the stepladder and the kneepads.
Nothing will improve your photography faster or make you look more "creative" than a fresh viewpoint. And getting that fresh viewpoint is often rather mechanical. It doesn't involve reading novels by Tolstoy or deep meditation leading to mystical revelations. It involves putting your camera in some unique location that will give you a new, novel, useful, or intriguing viewpoint. No other gadget you can carry in your bag is as valuable.
And no other photographic technique is as neglected by the vast hordes of photographers producing pictures. Put even more simply it comes down to this: rely more on legwork, less on Photoshop.So consider these tips for getting a different viewpoint—up high.
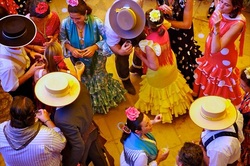
- Look around for a high spot. A surprising number of locations have a place you can get up on: a balcony, stairway, tower, tree, veranda, or (if you are lucky) skyscraper. The higher you get the more interesting the scene becomes. Confusion becomes patterns and chaos becomes interesting. So look around. Even a window over a courtyard is sufficient.
- Take your own altitude. Even a lowly stepladder can make a huge difference. Especially if you are in a crowd. Just getting a couple of feet above the heads of the crowd can mean getting interesting pictures. I know newspaper photographers who carry a lightweight aluminum stepladder in the trunk of their car all the time. I'll sometimes find a hardware store and buy a stepladder for a shoot. And a surprising number of stepladders lurk in the back rooms of shops, available to courteous photographers who ask very nicely.
- Practice the "Hail Mary" shot. Newspaper photographers for generations have relied on the "Hail Mary," holding their camera over their head to get above the crowd. You'll see it every time the photographers rush out to get the Super Bowl winners celebrating. Just raising your camera over your head can sometimes make an image. You'll be shooting by feel, pointing the camera as best you can, then reviewing your technique instantly on the LCD screen. A couple of quick adjustments and you can probably come close to the framing you want. And you'll get better with practice.
- Climb every tower. Towers and steeples are golden opportunities, especially in the medieval cities of Europe. Yes, I know there are lots and lots of steps to get to the top. But the reward is a priceless picture. And you'll have your sob story of self-sacrifice to tell with your picture, sure to garner you fawning sympathy (if you play it up really well).
- Get the camera on the ground. With practice you can learn to put the camera on the ground, angle it up a bit and shoot away. How much to angle it is the trick, as you'll probably want just a bit of ground across the bottom. A couple of test shots can usually teach you this. Or try putting a small stick or rock under the lens. Once you know where to put it to get just the right angle you can shoot in confidence.
- Carry a small tripod. Any of the really small tabletop tripods will do the trick and don't take up much space in your bag.
- Use your tipping view screen. If your camera has a screen that rotates and tips you are lucky indeed. You can put your camera in all sorts of weird locations and still see what is happening in the frame. I know golf photographers with a full complement of professional gear who carry a simple point-and-shoot for just this reason.
- Find a seat. Spectators at a parade or other event will often block your view. You could stand in front of them but you'll make no friends doing that! But you can often sit down on the ground in front of the crowd and nobody will care. Add a joke or two and you may even be welcomed.
- Buy a right angle finder. This devise can be very rewarding. Most manufacturers and some third-party vendors make accessory finders that slide onto your DSLR eyepiece and let you look down (at a right angle) while your camera is pointing out. This is great for macro work with small flowers and mushrooms. But it can also be used for lots of other kinds of pictures as well. And it doesn't take up much space in the bag, either.
- Look around for a puddle of water. Get down low to the surface of the water (like a couple of inches) and you'll suddenly have wonderful reflections to work with. Even a small puddle of water, only a foot in diameter, is enough. Street scenes at night really jump to life when you do this.
- Get beneath things and look up. If looking down from on high is interesting, so is the view from below. It doesn't happen as often but is worth looking out for. Looking straight up in European cathedrals at the patterns of stonework is one example, but putting your camera under a bed of flowers is another, less commonly used, opportunity.
PHOTOGRAPHED BY JIM RICHARDSON
Shooting With Available Light
Available-light photography has always held the allure of intimacy. Other genres reach for grandeur and beauty or the brutal impact of graphic truth. Available light offers something else: the exotic possibility of going beneath the surface and into the shadows to reveal what is hidden.
What follows is not a technical primer but advice from the hard-won lessons of getting pictures out of tough situations. What I offer is practical, not theoretical. I'm like the man in the joke who spends hours looking for his lost keys under the streetlight, instead of down the darkened street where the keys can be found. "Because the light is better here," he explains.
Actually, that's what we do in available-light photography: look for the interesting light, then figure out how to use it to make an interesting picture. After all, most of what we like about those after-dark pictures is the haunting, unexpected character of the light creating brooding scenes that seem to reveal the world. They're not necessarily about the seamy underbelly of life, but there is always the hint that we are eavesdropping.
(Before I begin in earnest I should make a small confession: I made an additional calculation on taking this available-light picture at a hacienda outside San Miguel de Allende in Mexico. I didn't cheat, per se, but I'm just not making full disclosure by calling it available light. And I'll explain why in just a bit.)
So let me offer a few tips about taking successful pictures when the light gets low:
What was the trick I alluded to earlier when I photographed the girl in the Mexican shop? I waited until she came over by the door where soft light from the fading sunset lit her beautifully. I didn't follow her around. I found the nice light and waited for the picture to happen there. Like the man under the streetlight, I looked for my keys where the light was better.
What follows is not a technical primer but advice from the hard-won lessons of getting pictures out of tough situations. What I offer is practical, not theoretical. I'm like the man in the joke who spends hours looking for his lost keys under the streetlight, instead of down the darkened street where the keys can be found. "Because the light is better here," he explains.
Actually, that's what we do in available-light photography: look for the interesting light, then figure out how to use it to make an interesting picture. After all, most of what we like about those after-dark pictures is the haunting, unexpected character of the light creating brooding scenes that seem to reveal the world. They're not necessarily about the seamy underbelly of life, but there is always the hint that we are eavesdropping.
(Before I begin in earnest I should make a small confession: I made an additional calculation on taking this available-light picture at a hacienda outside San Miguel de Allende in Mexico. I didn't cheat, per se, but I'm just not making full disclosure by calling it available light. And I'll explain why in just a bit.)
So let me offer a few tips about taking successful pictures when the light gets low:
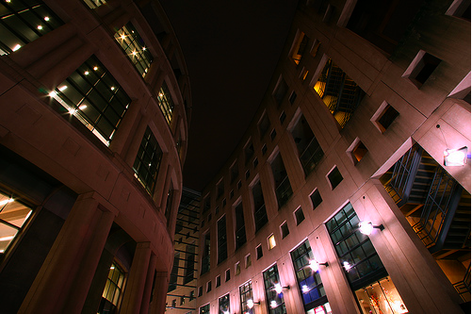
- Follow the light. If he was a photographer, the guy looking for his keys under the streetlight had the right idea. Find the light and you'll probably find the picture. Certainly that was the case when I was wandering Arles in Provence several years ago and found that the town had covered all the streetlights with pink filters for a fashion festival. Now that was great light, even if there wasn't a lot of it. (A tripod can fix that.) The same goes for photographing an Irish pub (find one with nice light) or the streets of New York (Times Square is actually very bright).
- Balance the light. Contrast is your enemy. The big problem is not necessarily that it is dark (we'll talk about that in a minute) but that the scene is so bright in some places and dark in others. The range from light to dark is simply more than the camera can handle well. So start training your eye to recognize where the light from all the sources is fairly well balanced. Suddenly your pictures will start looking rich and colorful.
- Go with a faster lens. "Fast" means a big f-stop, like f/2 or f/1.4. Big f-stops deliver more light. After decades of available-light shooting, I generally find a good f/2.8 lens fills the bill. The truth is that really good f/1.4 lenses are rare. I can count on two fingers the lenses I have owned that I would trust at f/1.4, and this includes several "legendary" lenses that didn’t deserve the status. In addition, the shallow depth of field combined with the low light of the scene means that getting a sharp focus is exceedingly tough. Better: f/2 lenses. When you get to f/2.8, most lenses deliver decent optical quality along with sufficient depth of field to generate real working images. Note: Most affordable zoom lenses may start out at f/2.8 at the wide-angle position and end up at f4.5 (or slower) at the telephoto end of the zoom range. Frankly, f/4.5 won't cut it for available light. This is why pros pay big bucks for zoom lenses that are a constant f/2.8.
- Consider using a prime lens. If that phrase isn't familiar to you, it just means a non-zoom lens. A 24mm f/2.8 lens is a good example. A 50mm f/1.8 is another. They almost always have a faster f-stop and, hence, will do better in low light. There are two other reasons why prime lenses are the available-light photographers' friends. First, they are smaller and easier to handle, making working in tight situations more natural. Second, they generally have less flare. This is important in available-light situations where the photographer is dealing with several light sources in the picture, like streetlights in the background or lightbulbs in the jazz club. They work better "against" the light.
- Maximize your ISO. When a camera can really crank up the ISO, there is real payoff—and it is a digital-age wonder. I spent my early years in photography thinking that shooting black-and-white film at ASA 1600 was incredible. (That's not a typo: ASA was the standard that preceded ISO.) The pictures were grainy and the tonal range was horrible, but you could get images, if just barely. Today’s cameras routinely go up to ISO 3200 and deliver great image quality. I regularly pay a premium for cameras that deliver good images at ISO 6400 and higher. To me, it's worth it. (P.S. If you get a little noise in your pictures with the higher ISO, just get over it. A good picture will trump a little noise every time.)
- Wait to shoot until people look into the light. If you're trying to photograph people in miserably low light, simply wait until your subject looks up into the light. When they do, be ready. You may have only an instant when their faces are fully lit. Suddenly a "bad" light situation will become tolerable. This is an old trick. Think of all those great pictures from the classic age of jazz photography. The musicians are always looking up!
- Calm down. Camera shake is your greatest enemy. Take a moment to calm down, breathe easy, concentrate, let your heartbeat slow, and get in the zone. Practice finding a steady position, work on holding your camera solidly but not tightly. Learn to lean on things to gain support. Squeeze off the shutter, smoothly and without jerking.
- Wait for motionless moments. Pay attention to your subjects; they often have moments when they stop moving for a second or two. Often they will do it again. Learn their tells (like a good poker player) and you can be ready when the next moment of stillness happens.
- Use your motor drive. The motor drive is also known as "the poor man's tripod." True enough. If you fire off five shots with the motor drive, at least one of them should be sharper than the rest, for lots of reasons. The motion of pushing the shutter often blurs the first frame but the second and third frames are much sharper. Or it could be just random luck with one frame coming at a steadier moment. With a subject that is moving, your camera’s motor drive gives you better odds of capturing a sharp shot.
- Learn to love blur. When all else fails, try to embrace the blur that you have to accept anyway. Blur is just another word for motion, and motion in an image can be good. Think of the incredible energy of Carnival in Rio and you have the perfect example of a subject that just cries out for action made dramatic.
What was the trick I alluded to earlier when I photographed the girl in the Mexican shop? I waited until she came over by the door where soft light from the fading sunset lit her beautifully. I didn't follow her around. I found the nice light and waited for the picture to happen there. Like the man under the streetlight, I looked for my keys where the light was better.
Downloaded from net.
